On this page
Bridge is the backbend to learn first. Lying on your back means the floor supports you the whole time, the lift comes from the legs rather than the spine, and there is no balance element to manage. It opens the chest and strengthens the back, glutes and legs at once, and it is calming and energising in the same shape.
What it is
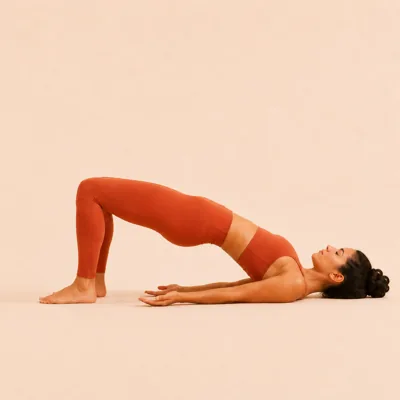
You lie on your back, bend the knees and plant the feet flat and hip-width apart, close enough that your fingertips can just brush the heels. Then you press down through the feet and lift the hips toward the ceiling, keeping the knees pointing forward, rolling the shoulders under and opening the chest.
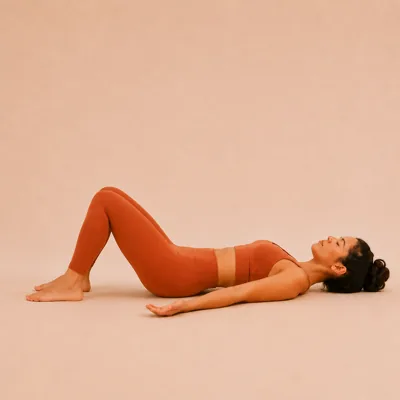
The distance of the feet from the hips is the setup that decides the pose. Fingertips brushing the heels is a reliable measure. Too far away and the hamstrings take over and often cramp; too close and the knees travel past the ankles.
The lift comes from the legs and hips pressing down, not from arching the spine upward. The chest opens as a consequence of rolling the shoulders under, which is the part that makes it a chest-opener rather than only a hip lift.
The neck stays still throughout. Turning the head while the shoulders are loaded is the one genuine risk in this pose.
How to practise it
-
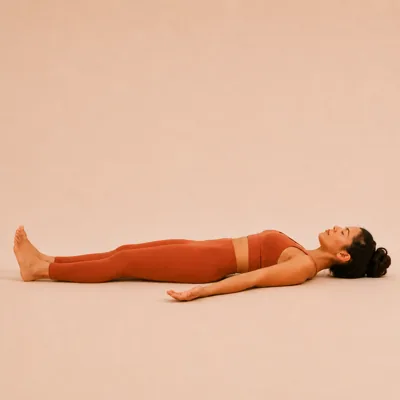
Lie down and settle
Lie flat on your back with the legs extended, arms resting alongside the body, palms down. Take a few breaths here to settle in.
-
Bend the knees
Bend the knees and plant the feet flat on the floor hip-width apart, close enough that your fingertips can just brush the heels.
-
Lift into Bridge
Press down through the feet and lift the hips up towards the ceiling, keeping the knees pointing forward. Roll the shoulders under and open the chest. Clasp the hands beneath you or keep the arms flat. Hold, breathing steadily and lifting the hips a little higher with each breath if it feels good.
-
Lower down
Release the hands and lower the spine slowly back down, one vertebra at a time, until the hips rest on the floor with the knees still bent.
-
Rest
Extend the legs back out and rest flat on your back, letting the breath settle before moving on.
How long and how often
A few steady breaths in the lift, then lower and rest. Two or three rounds is a reasonable practice.
Come down slowly, one vertebra at a time, rather than dropping. That controlled lowering is a real part of the work and it protects the lower back.
Rest flat with the legs extended between rounds and let the breath settle.
What usually goes wrong
Turning the head while lifted. The neck stays still with the shoulders rolled under. Turning the head under load is the main thing to avoid in this pose.
Letting the knees splay outward. The knees point forward and stay roughly hip-width. Splaying takes the work out of the glutes and puts it into the lower back.
Placing the feet too far from the hips. Fingertips should just brush the heels. Feet too far forward loads the hamstrings and is the usual cause of cramp.
Dropping down. Lower the spine one vertebra at a time. Collapsing out of the shape wastes half the exercise and jolts the lower back.
Who should take care
Practise safely. Avoid in case you have acute back/neck injury, late pregnancy, or shoulder injury, and come down slowly if you feel dizzy or sharp pain. See our full Health & Safety Disclaimer.
Lift, hold, and lower slowly
PanchPrana sets the feet before the lift and cues the slow descent, which are the two parts that decide whether the pose feels good. Bridge is one of the 66 techniques that are free to practise in full, with no account needed.


Common questions
How far from my hips should my feet be?
Close enough that your fingertips can just brush your heels. That is the measure the app gives and it works well for most people.
Can I clasp my hands underneath?
Yes, if the shoulders allow it. Clasping the hands beneath you helps roll the shoulders under and open the chest. Keeping the arms flat alongside is equally fine.
Why does my hamstring cramp?
Usually the feet are too far from the hips, which makes the hamstrings do the lifting instead of the glutes. Walk the feet closer.
Who should avoid it?
The app says to avoid it with an acute back or neck injury, late pregnancy, or a shoulder injury, and to come down slowly if you feel dizzy or any sharp pain.
Is it a backbend or a leg exercise?
Both. The legs and glutes produce the lift and the chest opens as the shoulders roll under, which is why it is a good introduction to backbending.